BlastBeats Manual
USER MANUAL
Thank you for choosing Blast Beats. Visit the Twisted Electrons website to stay up to date with the latest firmware and manual revisions.
Because the feature set evolves regularly, check the website for updates to this manual. Feedback and ideas are welcome at info@twisted-electrons.com.
FEATURES OVERVIEW
At the heart of this groovebox is a YMF262 chip, also known as the OPL3 FM chip. This is the same chip family used in Sound Blaster 16 and Sound Blaster Pro 2 sound cards from 1990s computers.
Blast Beats has two stereo YAC512 DACs, giving you four individually assignable outputs for multitracking and instrument routing. It has 10 voices: six drum voices (kick, snare, tom, closed hat, open hat, and cymbal) and four synth voices. Each synth voice can be dual-operator or quad-operator, depending on the selected algorithm.
Other features include eight waveforms per operator, 56 faders with per-step automation, and 32 illuminated buttons: three mode buttons at the top left, three transport buttons at the bottom left, a Top 10 row of voice/function buttons, and a Bottom 16 row of step buttons.
Blast Beats includes DIN5 MIDI IN and OUT for receiving and transmitting MIDI, plus USB for firmware updates and USB MIDI on supported firmware. It also includes four assignable mono 1/4-inch TS outputs, one mono 1/4-inch TS mix output, one dual-mono 1/4-inch headphone output carrying the mix on both sides, analog sync in and out on 1/8-inch mono TS jacks, and a microSD card slot for data storage.
POWER SUPPLY SPECS
Use the included power supply. Blast Beats requires a 9 V center-positive supply that can provide at least 550 mA.
ABOUT DRUM AND SYNTH VOICES
The YMF262 FM chip synthesizes drum sounds with several FM operators. Some operators are shared between instruments, so some faders affect more than one voice:
- Hats and tom share the same pitch modulation.
- The snare multiplier also affects the pitch of the hats and tom.
This hardware limitation can lead to useful and unexpected results.
There are four synth instruments. Synths 1 and 2 are monophonic. Synths 3 and 4 are duophonic, but they use their two voices differently:
- Synth 3 has two overlapping voices for two-note chords. You can record one or two notes on each Synth 3 step.
- Synth 4 triggers both voices at once. They can be detuned with the Operator 3 Tune fader, which is useful for wide bass lines and chord stabs.
Each synth instrument can use one of five algorithms selected with the Algo fader.
The snare drum is special: some waveforms silence it, so waveforms 4, 5, and 6 are disabled for the snare.
SYNTH ALGORITHMS
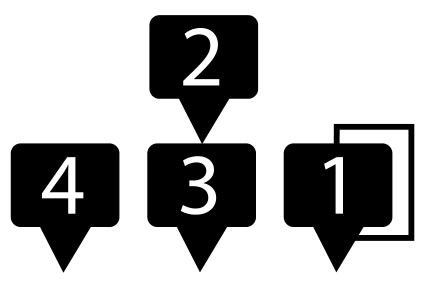
The Blast Beats synth voices use up to four oscillators, referred to as operators. The algorithm diagrams show operators as numbered boxes. Arrows show the modulation signal path.
When one operator feeds another, it modulates that operator's frequency. Some operators can feed back into themselves; this is shown by a line that loops from the operator output back to its input.
Blast Beats provides five synth algorithms:
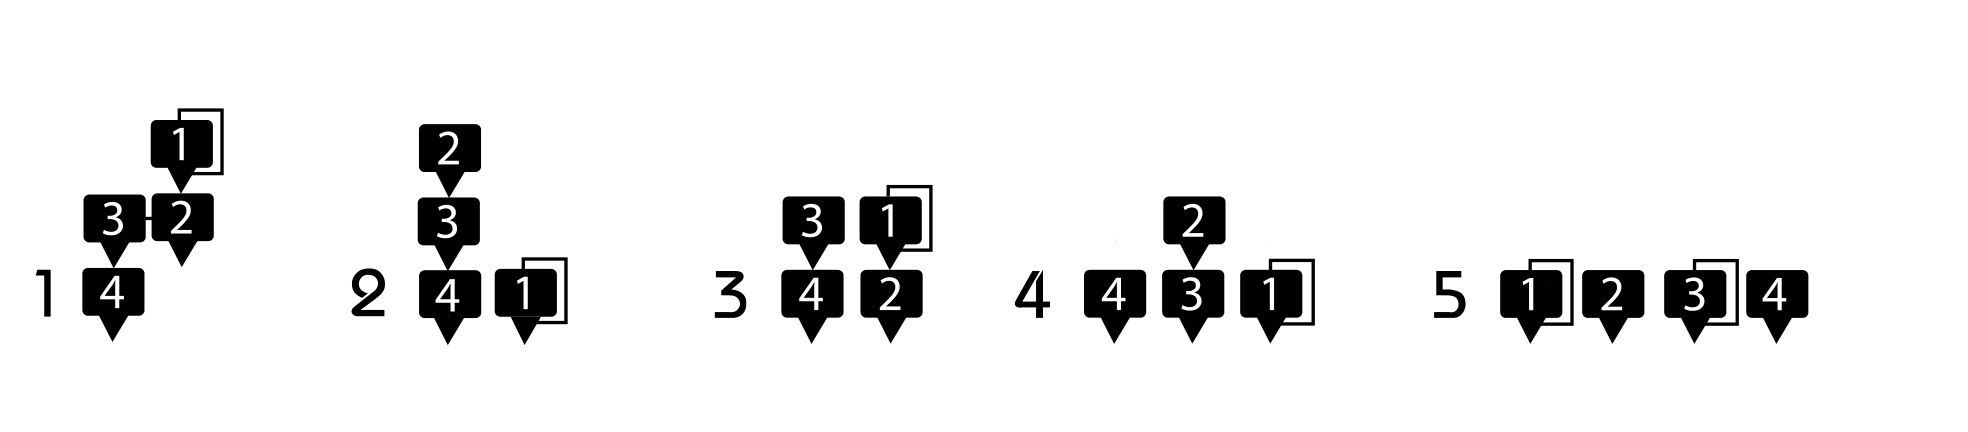
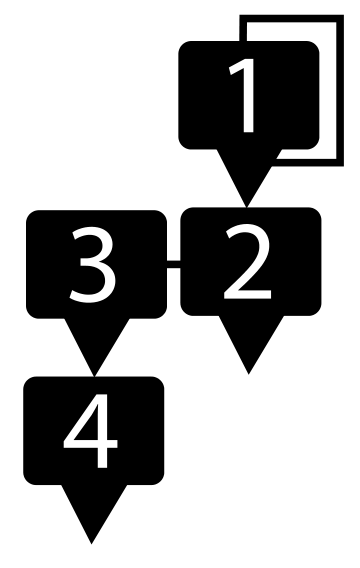
Algo1
Operator 4 is the carrier. With operators 1-3 muted, operator 4 produces a pure waveform. Operator 1 modulates operator 2, operator 2 modulates operator 3, and operator 3 modulates operator 4. Because the modulation stacks through the full chain, this algorithm can create the most complex and distorted tones.
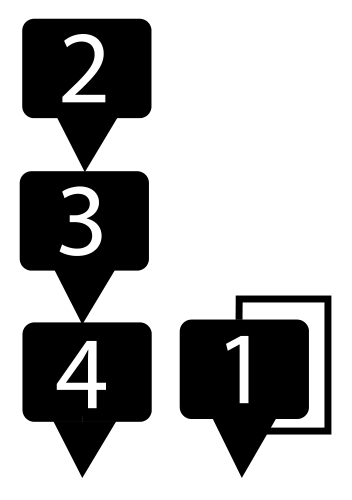
Algo2
Operator 1 is unmodulated, although applying vibrato with the OP2 fader can bend it. Operators 2-4 form a chain similar to Algo 1: operator 4 is the carrier, modulated by operator 3, which is modulated by operator 2.
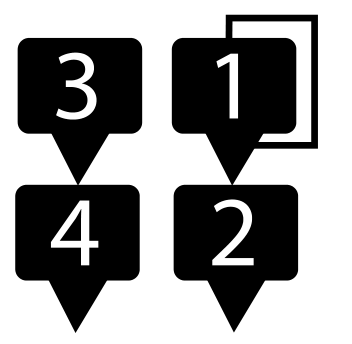
Algo3
This algorithm splits the synth into two 2-operator voices that can be detuned with the Tune fader. Operator 4 is a carrier modulated by operator 3. Operator 2 is a second carrier modulated by operator 1.
Algo4
Operators 1 and 4 are independent carriers. Operator 3 is also a carrier, modulated by operator 2.

Algo5
All four operators are carriers, playing together as independent sound sources.
When you select a synth track and move one of its faders, the selected algorithm is shown by a blinking Top 10 LED: LEDs 1-5 correspond to algorithms 1-5.
STEP EDIT MODE
Entering Step Edit Mode
Press Step to edit individual steps in the current pattern. While the sequencer is running in Step Edit Mode, the Bottom 16 buttons represent the steps on the current page.
LED Chasing
Each step briefly blinks as the sequencer passes it. Patterns can be up to four pages long (64 steps). By default, the chase indicator is shown only when the current step is on the page you are viewing.
To make the chase indicator blink across every page, hold Function and press Step. Repeat the same shortcut to return to the default current-page-only behavior.
Selecting a Page
If a pattern is longer than one page, press Step to move through its pages. The Top 10 LEDs briefly show the current page. See Length Mode for changing the number of pages and the final step.
Selecting an Instrument
Press any Top 10 voice button to select a voice. If the sequencer is stopped, selecting a voice also triggers it so you can preview the sound.
Cloning a Synth
To copy one synth sound to another, hold the source synth's Top 10 button and press the destination synth's Top 10 button. For example, hold Top 10 button 7 and press Top 10 button 9 to copy Synth 1 to Synth 3.
Cloning a Step
Make sure REC is unlit. Hold REC and press the step you want to copy, then press any destination step. The copied step includes its on/off state, note number, and step automation.
X0X-Style Step Input
When REC is off, press Bottom 16 buttons to switch individual steps on or off. If the sequencer is stopped, synth tracks play the selected step's note when you toggle it.
Step Nudging / Micro-Timing
To delay a step, hold that step for about one second, then press one of the Top 10 buttons to choose the delay amount.
To apply the same nudge value to every step in the selected track, hold Function and press one of the Top 10 buttons. This is useful for tightening or quantizing a recorded part.
Transposing a Synth Step
Hold a synth step and press Kit/Patt to transpose it down one semitone, or Function to transpose it up one semitone. The synth plays the new note.
Real-Time Drum Input
With REC armed and Blast Beats running, press Top 10 buttons 1-6 to record drum hits.
Real-Time Synth Input
With REC armed and Blast Beats running, use the Bottom 16 buttons to record synth notes in real time. The Bottom 16 LEDs represent a piano keyboard; lit LEDs are white keys.
Synth Monitor Mode
To practice a synth without arming REC, double-tap one of the synth voice buttons (Top 10 buttons 7-10). The Bottom 16 buttons become a playable keyboard. Double-tap a synth voice button again to leave monitor mode.
Changing the Synth Octave While Recording
Hold REC and press Kit/Patt for the low octave, Step for the normal octave, or Function for the high octave.
Changing the Playback Octave
Hold a voice's Top 10 button and press Kit/Patt to transpose that voice down one octave, Step to return it to the mid-range octave, or Function to transpose it up one octave. Press Kit/Patt twice while holding the voice to transpose down two octaves. Double-tap Kit/Patt, Step, or Function to apply that octave change to all voices.
Step-by-Step Synth Input
Hold REC and press Run to toggle step-by-step synth input. When Blast Beats is stopped, REC is armed, and a synth voice is selected, the Bottom 16 buttons enter notes one step at a time. A blinking Bottom 16 LED shows the current target step, and the target advances after each note. Press Step to enter a rest.
When the sequence reaches its end, it loops back to step 1 and overwrites from there. You can also enter notes from MIDI on the selected synth's MIDI channel. To restart from step 1, turn REC off and on again.
Arbitrary Step Synth MIDI Input
Hold a synth step for at least one second, then play a note from a MIDI controller on that synth's MIDI channel. The held step is enabled or updated with the new note.
Undo / Redo
Whenever REC is pressed before recording changes, Blast Beats creates a snapshot of the current pattern. In Step Mode, hold Function and press REC to undo or redo that snapshot.
Page Rotate
Hold Step and press Kit/Patt to rotate the selected page left, or Function to rotate it right.
KEY / SCALE CHANGE MODE
Hold Step and press Run to enter Key / Scale Change Mode. Press Kit/Patt, Step, or Function to leave this mode and return to the corresponding mode.
Key and scale changes affect all synth tracks at the same time. Use the Bottom 16 buttons to transpose the pattern. These buttons represent piano keys; lit buttons are white keys. If REC is armed, key changes are recorded. To clear recorded key changes, use Clear Mode.
Hold Function and press a Bottom 16 button to choose the tonic (root note).
Use the Top 10 buttons to choose the scale:
1 Chromatic - all 12 semitones are available.
2 Major (Ionian) - whole, whole, half, whole, whole, whole, half.
3 Minor (Aeolian) - whole, half, whole, whole, half, whole, whole.
4 Dorian - minor third with a major sixth.
5 Lydian - major scale with a raised fourth.
6 Mixolydian - major scale with a flattened seventh.
7 Blues - flattened third, fifth, and seventh.
8 Melodic Minor - minor third with a raised sixth and seventh when ascending.
9 Harmonic Minor - minor scale with a raised seventh.
10 Gypsy - minor third with augmented seconds.
KIT / PATTERN MODE
Press Kit/Patt to enter Kit / Pattern Mode. In this mode, you can change patterns, chain patterns, and assign kits to patterns.
Kits and Variations
Each song can use up to 10 kits, and each kit has four variations. That gives each song access to 40 kit variations.
Firmware 4.0 and later can use song-specific kits. If a song folder contains its own KITS folder, Blast Beats loads kits from that folder. If no song-specific KITS folder exists, it uses the global KITS folder at the root of the SD card.
Changing Kit
Press a Top 10 button to change the kit assigned to the current pattern. To automate kit changes per step, change kits while REC is lit. To clear kit automation, hold Kit/Patt and press Clear.
Kit Reload
Hold Function and press Kit/Patt to reload the kit from the SD card. This clears unsaved kit edits.
Cloning Kits
Hold the Top 10 button for the source kit and press another Top 10 button to paste it to the destination kit. You can paste to multiple destinations while holding the source kit.
Changing Kit Variations
While in Kit / Pattern Mode, hold Kit/Patt and press one of the first four Top 10 buttons to select the current kit variation. The active variation LED flashes.
Cloning Kit Variations
Hold Kit/Patt, hold the Top 10 button for the source variation, then press one or more of the other first four Top 10 buttons to overwrite those variations.
Changing Pattern
Press a Bottom 16 button to change pattern. If the sequencer is stopped, the pattern starts immediately. If it is running, the next pattern is cued and changes at the end of the current pattern. The cued pattern flashes on the Bottom 16 row. All tracks resync after the pattern change.
Cloning Pattern
Hold the Bottom 16 button for the source pattern and press another Bottom 16 button to paste it. The assigned kit is loaded automatically when you change patterns.
Chaining Patterns
1. Press REC. The REC LED lights solid.
2. Press the first pattern in the chain. REC starts blinking, which means chain recording is ready. This overwrites the previous chain.
3. Press Run to start recording the chain. Change patterns while the sequencer plays to build the song. Repeated patterns are allowed.
4. Press REC again at the end of the song. Blast Beats returns to the first pattern in the chain and loops the chain.
5. If playback is stopped, the chain resets to its first pattern.
Pattern chaining is recorded in real time and requires the sequencer to be running.
Clearing the Chain
To play only Pattern 1, press REC, press Bottom 16 button 1, then press REC again before Pattern 1 reaches the end of its cycle.
Adding or Replacing Patterns in the Chain
Start the song with Run. Arm REC at any point and press Bottom 16 buttons to swap patterns in the chain. If the end of the chain is reached while REC remains armed, the chain is extended until you disarm REC or stop the sequencer.
Freezing the Chain
Hold REC and press Freeze to temporarily freeze or unfreeze the chain without clearing it.
SONG MODE
Press Kit/Patt and Function together to enter Song Mode. Both LEDs light while Song Mode is active.
The SD card can hold 160 songs, arranged as 10 bank folders with 16 songs in each bank. Tap a Top 10 button to select the bank, then tap a Bottom 16 button to load a song.
Each song contains 16 patterns. Each pattern can be up to 64 steps long, arranged as four pages of 16 steps. A song can also contain a chain of up to 256 pattern changes.
Patterns, automation, chains, nudges, and song-specific kit folders are stored with the song. If a song does not have its own KITS folder, it uses the global kits from the root KITS folder.
FUNCTION MODE
Press Function to enter Function Mode and choose one of the function buttons.
Save Mode
Save Song stores the current song to the SD card. Choose a destination bank with a Top 10 button, then choose the song slot with a Bottom 16 button. The current bank and song slot are lit when you enter Save Mode.
Blast Beats writes to the SD card only when the sequencer is stopped. If the sequencer is running, saving is queued until you stop it with Run.
Save Kits stores the current kits. Press the flashing Kit/Patt button while in Save Mode. Saving kits does not save patterns.
Length Mode
Length Mode sets the pattern length from 1 to 64 steps by combining a page count with the final step on the last page. For example, two pages with the last step set to 4 gives a 20-step pattern.
Use the first four Top 10 buttons to set the number of 16-step pages for all tracks. Hold Function while choosing the page count to affect only the selected track.
Use the Bottom 16 buttons to set the final step on the last page for all tracks. Hold Function while choosing the final step to affect only the selected track.
Track 1 (BD) is the master track for pattern chaining and several automation timings. Its length affects overall pattern timing.
To resync all tracks to step 1, hold Function and press Run. To choose another track without leaving Length Mode, hold Step and press a Top 10 voice button.
Copy Page
In Length Mode, hold REC and press a page to copy it, then press another page to paste it. This copies all voices. Hold Function during the paste to paste only the selected voice.
Clear Mode
- Hold Clear and move a fader to erase that fader's automation.
- Hold Clear and press REC once to clear automation for the selected track. Press REC a second time without releasing Clear to clear all automation for the current pattern, including tricks, tremolo, vibrato, kit changes, volume, and routing automation.
- Hold Clear and press a Top 10 button to clear the steps and automation for one track.
- Hold Clear and press Kit/Patt to initialize the current pattern as a blank 16-step pattern.
- Hold Clear and press Wiggle, Vibrato, Tremolo, or Swing to clear that automation lane.
- Double-tap Clear in Clear Mode to reset the current kit's faders to zero.
- Hold Clear and press Run to clear recorded key changes.
Wiggle Mode
Wiggle adds randomness to selected faders. Hold Wiggle and move a fader to assign it to the wiggler. Press a Top 10 button to set the wiggle depth for the current pattern. Double-click a Top 10 button to apply that depth to every pattern in the song. With REC lit, wiggle depth changes are recorded as automation.
To remove a fader from Wiggle, hold Wiggle + Clear and move that fader. To clear all Wiggle assignments, hold Wiggle and press Clear.
Hold Wiggle and press Kit/Patt to shuffle the kit. Hold Wiggle and press Step to shuffle the pattern. The Blast Beats Editor can set whether Wiggle affects all steps or only enabled steps.
Swing Mode
Use the Top 10 buttons to set the swing amount for the current pattern. With REC lit, swing changes are recorded as automation.
Hold Function and press Swing to toggle Wonky Swing. Wonky Swing offsets the opposite step group from normal swing.
Mute Mode
Use the Top 10 buttons to mute or unmute voices.
To skip pages during playback, hold Mute and press one of the first four Top 10 buttons. A flashing page button is skipped. Up to three pages can be muted at once. Press the flashing page button again to unmute it.
Solo Mode
Use the Top 10 buttons to solo a voice. Press the active solo voice again to cancel solo.
Probability Mode
Hold Probability and press a Top 10 button to choose the target voice. Release Probability, then use the Top 10 buttons to set that voice's trigger probability.
Stutter / Drill
Hold a Top 10 button while Stutter is active to repeat the current step at a tempo-related rate. Hold Wiggle during Stutter to randomize the stuttered steps. Stutters are recorded when REC is lit.
Hold Tempo and press Stutter to toggle Drill mode. Normal Stutter repeats the held step. Drill keeps the sequencer moving while repeating each step in sequence.
Bend
Hold Bend to bend the global FM chip tuning downward. Use the Top 10 buttons to set bend strength. Hold Function during a bend to spin the pitch upward.
Freeze
Hold Freeze to suspend communication with the FM chip, creating sustained notes and glitch effects. Freeze can be combined with Bend and Stutter.
Tremolo
Use the Top 10 buttons to set the tremolo rate for the current pattern. Tremolo modulates operator volume and can be automated by changing it while REC is lit.
Hold Tremolo and press Kit/Patt, Step, or Function to set the tremolo speed ratio to slow, normal, or fast.
Vibrato
Use the Top 10 buttons to set the vibrato rate for the current pattern. Vibrato modulates pitch and can be automated by changing it while REC is lit.
Hold Function and press a Top 10 button in Vibrato mode to set the maximum vibrato depth. Hold Vibrato and press Kit/Patt, Step, or Function to set the vibrato speed ratio to slow, normal, or fast.
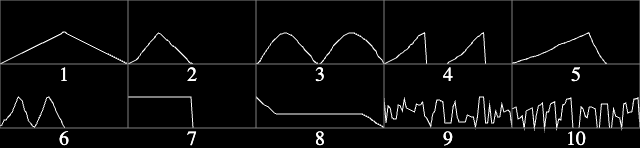
Vibrato / Tremolo Waveforms
Hold Tremolo or Vibrato, then press a Top 10 button to choose the waveform. The first eight buttons correspond to the printed waveform shapes, with button 5 using the updated ramp waveform. Buttons 9 and 10 select random waveforms. With REC lit, waveform changes are recorded as automation.
Phones
Use the Top 10 buttons to set the headphone level. This value is recalled at startup. With REC lit, headphone level changes are recorded as automation.
Mix
Use the Top 10 buttons to set the mix output level. This value is recalled at startup. With REC lit, mix level changes are recorded as automation.
Route
Route assigns instruments to the four outputs. Some voices are locked together by the YMF262 voice architecture: snare with hats, and tom with cymbal.
Hold Route and press a Top 10 button to select the target voice or voice group. Release Route, then press the first four Top 10 buttons to attach or detach that target from outputs 1-4. A voice can be routed to multiple outputs. With REC lit, routing changes are recorded as automation.
Route Presets
To save the current routing as a preset, enter Route mode, hold REC, and press a Top 10 button. To load a routing preset, hold Function and press a Top 10 button. Routing presets are stored in EEPROM, independently from songs and SD cards. The last used preset is reloaded at startup.
SEQUENCER CLOCK
Internal Clock
Blast Beats starts in internal clock mode unless an external sync source is detected.
Analog and MIDI Clock Out
SYNC OUT sends a 5 V pulse. The analog sync output can pulse every step or every fourth step. Toggle this setting by holding Function + REC, then pressing Tempo.
Blast Beats also sends MIDI Clock, Start, and Stop from the MIDI output while running as the master clock.
Analog Slave Mode
Connect a 1/8-inch mono TS cable to SYNC IN to activate Analog Slave Mode. Incoming analog pulses advance the sequencer, and MIDI clock is ignored while analog slave mode is active. If no pulses are received for several seconds, Blast Beats resets to step 1. Pressing Run in Analog Slave Mode also resets the sequencer to step 1.
MIDI Slave Mode
Blast Beats syncs to incoming MIDI clock after it receives a MIDI Start command. Pressing Run in MIDI Slave Mode resets the sequencer to step 1. Receiving MIDI Stop returns Blast Beats to master mode and stops the sequencer.
Tap Tempo
Tap Tempo five times to set the tempo. If Blast Beats is stopped, it starts on the fifth tap.
Manual BPM Entry
Hold Tempo and enter two or three digits with the Top 10 buttons. Top 10 buttons 1-9 enter digits 1-9, and Top 10 button 10 enters 0.
For 123 BPM, hold Tempo and press 1, 2, then 3. For 80 BPM, hold Tempo, press 8 and 0, then release Tempo. You can also enter 0, 8, 0 as a three-digit value.
Tempo Shortcuts
Hold REC and press Tempo to toggle record quantize. Hold Function and press Tempo to toggle the metronome. Hold Function + REC and press Tempo to toggle the analog sync output division.
FADER AUTOMATION
In Step Mode, you can record and automate the faders. Fader automation also transmits MIDI CC messages.
Recording a Fader
Press REC in Step Mode. The REC LED flashes, and fader movements are recorded and played back. Press REC again to stop recording faders.
Deleting Automation for One Fader
Press Function to enter Function Mode. Hold Clear and move the fader whose automation you want to delete.
Step-Lock Automation
You can write a fader value to a specific step without real-time recording. Make sure REC is off, hold the target Bottom 16 step, and move the fader.
Deleting All Fader Automation
Press Function to enter Function Mode. Hold Clear and press REC.
Trick Automation and Step Editing
In Function Mode, you can record and play back the three trick functions: Stutter, Bend, and Freeze.
To record a trick, press REC in Function Mode. The REC LED flashes, and activated bends, freezes, and stutters are recorded and played back.
To delete trick automation, press Function, then hold Clear and press Stutter, Freeze, or Bend.
To step-edit trick automation, hold Step and press Stutter, Bend, or Freeze to open that trick editor. Use the Bottom 16 buttons as you would for normal step editing. Press Step to change pages. To exit a trick editor, press Function, Kit/Patt, Step plus any Top 10 button, or repeat the shortcut used to enter it.
Bend and Freeze Step Editing
In Bend and Freeze editors, press a Bottom 16 button to turn the trick on or off for that step.
Hold Function and press Bend or Freeze to enable or disable the corresponding automation playback. Repeat the shortcut to enable it again.
Stutter Step Editing
In the Stutter editor, press a Bottom 16 button to select a step. If no stutter exists on that step, the LED lights and stutter is added. Press a Top 10 button to choose the stutter rate for the selected step. To clear a stutter step, press a lit Bottom 16 button twice.
Hold Function and press Stutter to enable or disable stutter automation playback. Repeat the shortcut to enable it again.
SPECIAL STARTUP SETTINGS
Hold the specified button while powering on Blast Beats to change startup settings. These settings can also be changed from the Blast Beats Editor at twistedelectrons.com/tool/BlastBeatsEditorR62/.
Safe Envelope Ranges
Hold Length at startup to toggle safe envelope ranges. The Length LED blinks once when safe ranges are on and twice when they are off.
When Safe mode is on, the attack and decay faders stay within preset ranges that are useful for drum machine sounds. When Safe mode is off, the faders reach the full range of the chip, including very long or infinite attack and release times for drones.
Faster Pitch Fall
Hold Bend at startup to toggle faster pitch fall. The Bend LED blinks once when faster pitch fall is on and twice when it is off. When faster pitch fall is on, the Fall faders pull instrument tuning up or down faster, which is useful for fast-paced music. Factory reset enables faster pitch fall.
MIDI Channel Routing
To enter MIDI channel routing mode, hold Route while powering on, shortly after the LEDs begin to blink.
Blast Beats listens and transmits on five configurable MIDI channel targets:
- Drums: default CH10
- Synth 1: default CH1
- Synth 2: default CH2
- Synth 3: default CH3
- Synth 4: default CH4
Select the target with the Top 10 buttons:
- Top 10 buttons 1-6 select Drums.
- Top 10 button 7 selects Synth 1.
- Top 10 button 8 selects Synth 2.
- Top 10 button 9 selects Synth 3.
- Top 10 button 10 selects Synth 4.
Press a Bottom 16 button to assign MIDI channel 1-16 to the selected target. Press the currently assigned channel again to turn that target off. Power-cycle Blast Beats to resume normal operation.
Factory Reset
Hold Clear at startup to reset settings to the factory defaults. This does not erase SD card song, pattern, or kit data.
Factory defaults:
- Faster pitch fall: on
- Current song: 1
- Current folder: 1
- Swing: off
- Phones and Mix volume: internal value 5, shown as the sixth Top 10 position
- All voices routed to all outputs
- Safe envelope ranges: on
- Drum MIDI channel: CH10
- Synth 1 MIDI channel: CH1
- Synth 2 MIDI channel: CH2
- Synth 3 MIDI channel: CH3
- Synth 4 MIDI channel: CH4
- Solo, mute, and program change control channels: CH16
FILE STRUCTURE (SD CARD)
The included microSD card contains song, pattern, automation, kit, and VGM data. Blast Beats requires a working FAT32 microSD card. If the card is not detected at startup, the LEDs flash while Blast Beats retries card initialization.
One SD card can hold up to 160 songs: 10 song banks with 16 songs in each bank.
Root folders:
- /SONGS stores song banks and songs.
- /KITS stores global kits.
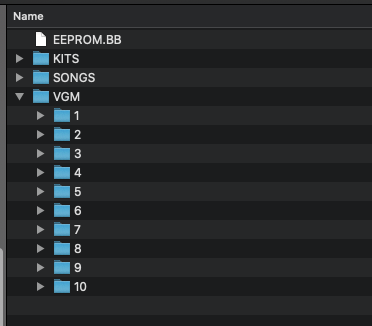
- /VGM stores VGM jukebox folders.
Song folders use this structure:
/SONGS/BANK1 through /SONGS/BANK10
/SONGS/BANKx/SONG1 through /SONGS/BANKx/SONG16
Each song folder can contain:
- AUTO.BB for automation and song-level data.
- CHAIN.BB for the pattern chain.
- PATD1.BB through PATD16.BB for drum patterns.
- PATS1.BB through PATS16.BB for synth patterns.
- NUDG1.BB through NUDG16.BB for step nudges.
- An optional KITS folder for song-specific kits.
Global kits use this structure:
/KITS/BANK1 through /KITS/BANK4
/KITS/BANKx/DRUM1.BB through DRUM10.BB
/KITS/BANKx/SYNT1.BB through SYNT10.BB
The four KITS banks correspond to the four kit variations. Each bank contains 10 drum kit files and 10 synth kit files.
Song-specific kits use the same KITS/BANK1 through KITS/BANK4 structure inside a song folder:
/SONGS/BANKx/SONGy/KITS/BANKz/DRUMn.BB
/SONGS/BANKx/SONGy/KITS/BANKz/SYNTn.BB
If a song-specific KITS folder exists, Blast Beats loads kits from it. If a song-specific kit file is missing, Blast Beats falls back to the matching file in the root /KITS folder. If no song-specific KITS folder exists, the song uses the root /KITS folder.
VGM files are stored in /VGM/1 through /VGM/10. See VGM Jukebox Mode for details.
FIRMWARE UPDATES
The Blast Beats firmware was ported to a different MCU in September 2023 after a global shortage of the original MCU. Because of that, there are two hardware revisions and two firmware sets.

Revision 2 units are marked with BB.R2 in the serial number label under the unit. R2 units accept only firmware labeled R2. Use R2 firmware only if your Blast Beats is Revision 2.
R1 Update Procedure
1. Connect Blast Beats to your computer with a standard USB type A to type B cable. Do not use a USB hub.
2. Hold Run and power on Blast Beats. No LEDs light while it is in update mode.
3. Connect the USB cable between Blast Beats and the computer.
4. Your computer shows a drive named UPLOAD_DISK.
5. Delete the file on that drive and copy the new firmware file to it.
6. The drive ejects automatically and Blast Beats reboots with the new firmware.
R2 Update Procedure: SD Method (Recommended)
1. Unzip the firmware package. The firmware file is named SD_USB_MSC_Application.bin.
2. Copy SD_USB_MSC_Application.bin to the root of the microSD card using a card reader or SD slot.
3. Insert the card into Blast Beats and power it on.
4. Blast Beats detects the firmware file and updates itself. The firmware file is removed from the card after the update completes.
R2 Update Procedure: USB Method
1. Insert the microSD card into Blast Beats.
2. Connect Blast Beats to your computer.
3. Hold Run and power on the unit.
4. After a few moments, your computer shows the SD card contents.
5. Copy SD_USB_MSC_Application.bin to the root of the microSD card.
6. The drive ejects automatically and Blast Beats reboots with the new firmware.
If Blast Beats does not restart after a while, turn it off and on again. The firmware file is removed from the card after the update completes.
BLAST BEATS EDITOR
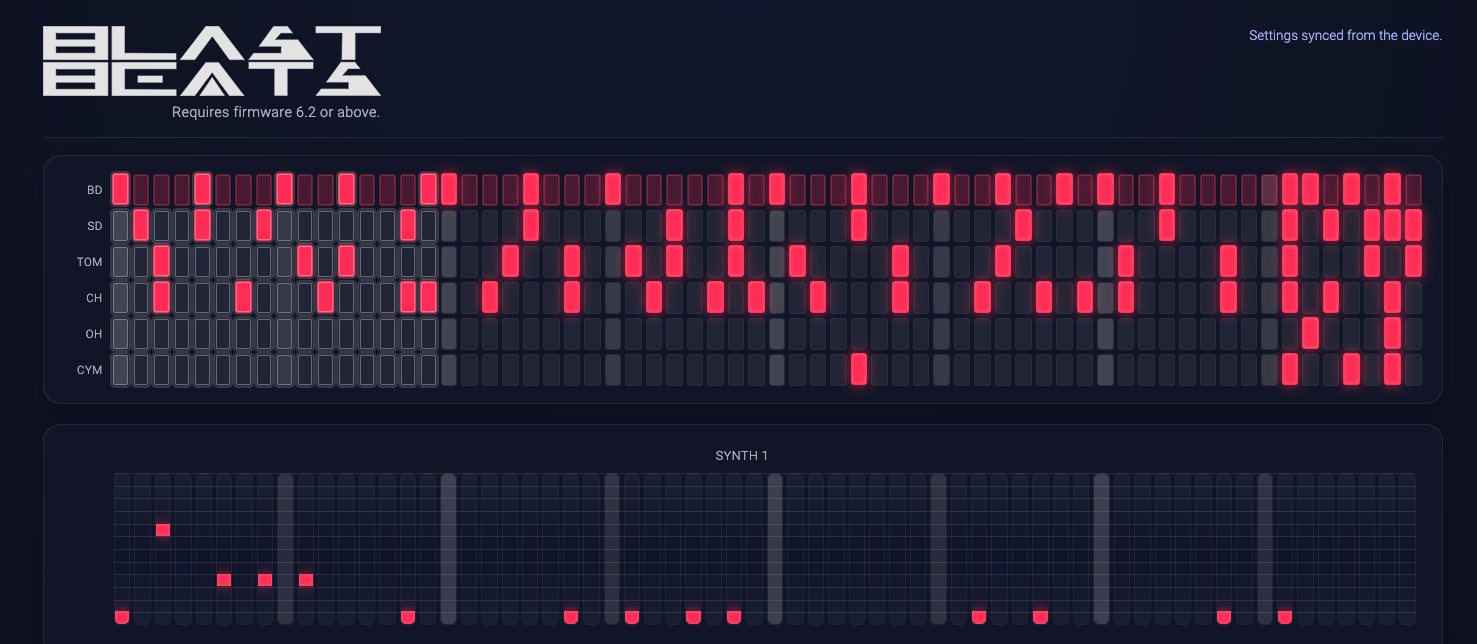
The Blast Beats Editor is a browser-based editor and pattern visualizer for configuring parameters inside Blast Beats. It requires firmware 6.2 or later and a Web MIDI browser such as Google Chrome.
Open twistedelectrons.com/tool/BlastBeatsEditorR62/, allow MIDI access, and connect Blast Beats over USB MIDI. The editor automatically searches for the Blast Beats MIDI input and output, then requests the current pattern and settings.
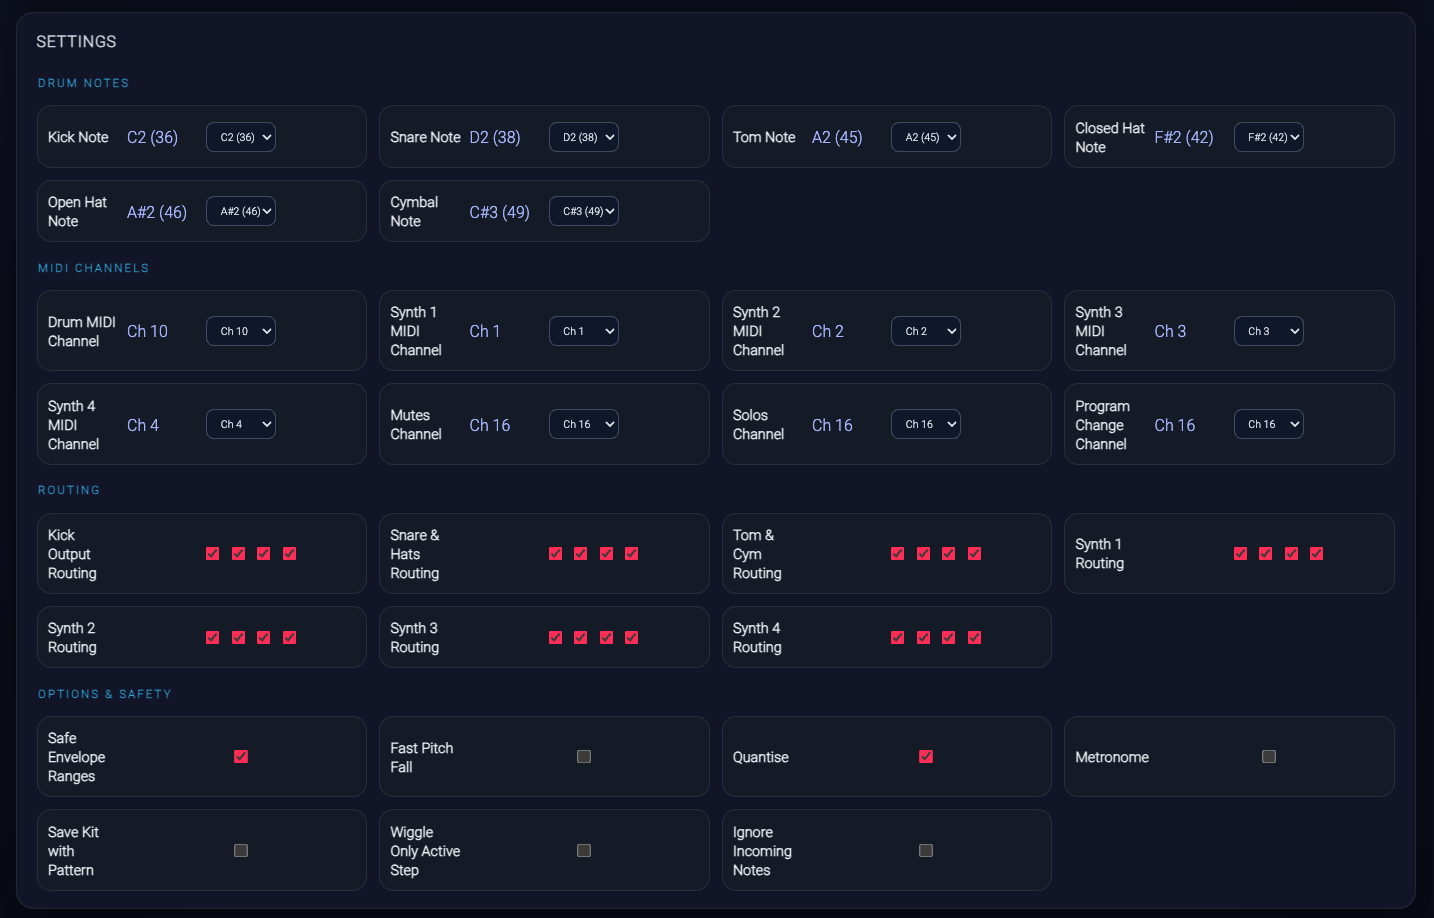
The pattern visualizer shows drum and synth steps and can edit them from the browser. The Settings panel edits drum note assignments, MIDI channels, output routing, and startup options. Setting changes are sent to Blast Beats when you change a control.
MIDI IMPLEMENTATION
Blast Beats responds to the following Note On messages by default.
You can change the drum note assignments and control channels with the Blast Beats Editor.
Visit twistedelectrons.com/tool/BlastBeatsEditorR62/ for more information.
Drum Voice MIDI Notes
Drums transmit MIDI notes from the MIDI output when triggered by the internal sequencer, so Blast Beats can also work as a MIDI drum sequencer. These are the factory default note assignments:
| Instrument | MIDI Note |
|---|---|
| 1 BD | 36 |
| 2 SD | 38 |
| 3 TOM | 45 |
| 4 CLOSED HAT | 42 |
| 5 OPEN HAT | 46 |
| 6 CYMBAL | 49 |
Drum Voice MIDI CC
Below is the MIDI control change implementation for the drum parts.
| Parameter | MIDI CC# | Range |
|---|---|---|
| Bass drum carrier volume | 20 | 0-127 |
| Bass drum carrier waveform | 21 | 0-127 |
| Bass drum carrier feedback | 22 | 0-127 |
| Bass drum carrier multiplier | 23 | 0-127 |
| Bass drum carrier tune | 24 | 0-127 |
| Bass drum carrier fall | 25 | 0-127 |
| Bass drum carrier attack | 26 | 0-127 |
| Bass drum carrier decay | 27 | 0-127 |
| Bass drum modulator volume | 28 | 0-127 |
| Bass drum modulator waveform | 29 | 0-127 |
| Bass drum modulator multiplier | 30 | 0-127 |
| Bass drum modulator multiplier fall | 31 | 0-127 |
| Bass drum modulator attack | 32 | 0-127 |
| Bass drum modulator decay | 33 | 0-127 |
| Snare volume | 34 | 0-127 |
| Snare waveform | 35 | 0-127 |
| Snare multiplier | 36 | 0-127 |
| Snare tune | 37 | 0-127 |
| Snare tune fall | 38 | 0-127 |
| Snare attack | 39 | 0-127 |
| Snare decay | 40 | 0-127 |
| Hats Volume | 43 | 0-127 |
| Hats waveform | 45 | 0-127 |
| Hats multiplier | 55 | 0-127 |
| Hats tune | 56 | 0-127 |
| Hats fall | 57 | 0-127 |
| Hats attack | 51 | 0-127 |
| Hats Decay | 54 | 0-127 |
| Tom vol | 42 | 0-127 |
| Tom waveform | 44 | 0-127 |
| Tom multiplier | 48 | 0-127 |
| Tom tune | 46 | 0-127 |
| Tom fall | 47 | 0-127 |
| Tom attack | 50 | 0-127 |
| Tom decay | 53 | 0-127 |
Synth Voice MIDI CC
Below is the MIDI control change implementation for the synth parts.
| Parameter | MIDI CC# | Range |
|---|---|---|
| Volume OP1 | 20 | 0-127 |
| Waveform OP1 | 21 | 0-127 |
| Feedback OP1 | 22 | 0-127 |
| Algorithm (all operators) | 23 | 0-127 |
| Multiple OP1 | 24 | 0-127 |
| Attack OP1 | 25 | 0-127 |
| Decay OP1 | 26 | 0-127 |
| Volume OP2 | 27 | 0-127 |
| Waveform OP2 | 28 | 0-127 |
| Multiplier OP2 | 29 | 0-127 |
| Tremolo | 30 | 0-127 |
| Vibrato | 31 | 0-127 |
| Attack OP2 | 32 | 0-127 |
| Decay OP2 | 33 | 0-127 |
| Volume OP3 | 34 | 0-127 |
| Waveform OP3 | 35 | 0-127 |
| Feedback OP3 | 36 | 0-127 |
| Tune | 37 | 0-127 |
| Multiplier OP3 | 38 | 0-127 |
| Attack OP3 | 39 | 0-127 |
| Decay OP3 | 40 | 0-127 |
| Volume OP4 | 41 | 0-127 |
| Waveform OP4 | 42 | 0-127 |
| Multiplier OP4 | 43 | 0-127 |
| Tremolo | 44 | 0-127 |
| Vibrato | 45 | 0-127 |
| Attack OP4 | 46 | 0-127 |
| Decay OP4 | 47 | 0-127 |
Solo & Mute MIDI Control
Blast Beats can control solo and mute states from special keyboard notes. These notes do not trigger sounds; they act as control switches.
Important: Solo and mute controls use MIDI Channel 16 by default. The Blast Beats Editor can change those control channels.
 Important: Solo and mute controls use MIDI Channel 16 by default. The Blast Beats Editor can change those control channels.
Solo (C6-A6, MIDI notes 84-93)
- The first 10 notes starting from C6 are reserved for solo selection.
- Each note corresponds to a Solo number (1-10).
- Pressing one of these notes activates the corresponding Solo. If that Solo is already active, pressing the same note again cancels it.
- Only one Solo can be active at a time.
Mute (C7-A7, MIDI notes 96-105)
- The first 10 notes starting from C7 are reserved for mute toggles.
- Each note corresponds to Mute channel 1-10.
- Pressing one of these notes toggles the mute state: unmuted becomes muted, and muted becomes unmuted.
- Multiple channels can be muted or unmuted independently.
Program Change (PC) Control
Blast Beats responds to MIDI Program Change messages for quick selection of patterns and kits.
- MIDI Channel: Program Change uses Channel 16 by default. The Blast Beats Editor can change this channel.
- Program Numbers: DAWs often display PC as 1-128, while MIDI sends values 0-127. Both notations are shown below.
| Action | PC Number (human) | PC Value (raw MIDI) | Notes |
|---|---|---|---|
| Pattern 1-16 | 1-16 | 0-15 | Cues pattern |
| Kit 1-10 | 17-26 | 16-25 | Loads kit immediately |
| Not used | 27-128 | 26-127 | Ignored |
Examples
- To select Pattern 8: send PC 8 (value 7) on Channel 16.
- To select Kit 3: send PC 19 (value 18) on Channel 16.
Notes & Tips
- No Bank Select (CC0/32) is required or used.
- If your DAW has 1-based PC numbering, use the PC Number column.
- If your MIDI tool shows raw values 0-127, use the PC Value column.
VGM JUKEBOX MODE
Hold Tempo while powering on Blast Beats to enter VGM Jukebox Mode.
Blast Beats looks for a folder named VGM at the root of the SD card. Inside /VGM, create folders named 1 through 10. The Top 10 buttons select those VGM folders.
Put VGM files inside the numbered folders. The Bottom 16 LEDs show the available files in the selected folder, up to 16 files. Press a lit Bottom 16 button to play that file. Keep 16 or fewer files in each folder for predictable selection from the hardware buttons.
Blast Beats supports YMF262/OPL3 and YM3812/OPL2 VGM files in .vgm format and gzip-compressed .vgz format. Current firmware can read .vgz files directly, so you do not need to rename or extract them first.
YM3526/OPL and Y8950 FM-compatible register streams are also mapped to the YMF262. Y8950 ADPCM sample playback is not supported. Dual-OPL2 VGM command streams are mapped to the two YMF262 register banks where possible.
Many compatible files are available from VGM archives such as vgmrips.net. Choose YMF262/OPL3 or YM3812/OPL2 material for best compatibility.
TROUBLESHOOTING
Problem: Blast Beats will not boot and the LEDs flash repeatedly.
Solution: Blast Beats cannot initialize the microSD card. Check that the card is inserted correctly, formatted as FAT32, and contains the required factory files.
Problem: Firmware update mode shows a corrupt or unreadable drive on Windows 10.
Solution: Some older USB chipsets have compatibility issues with this update mode. Try another USB port, avoid USB hubs, or use another computer.
Problem: Patterns or kits will not save.
Solution: Back up the SD card, format it as FAT32, and copy the factory presets back onto it. This often resolves save problems caused by card corruption.